How to Use an HP Printer (A Beginner's Guide)
Posted by Dunja Djuragic on 05/03/2023
")
So your brand new HP printer just arrived! Great!
You open the box and check out the user manual. Of course, it’s 100 pages of technical talk.Lucky for you, you don’t have to suffer through this - with our quick guide on how to set up and use your HP printer, you may never need to open the manual at all.
Let’s get unboxing and connecting!
Out of the Box: HP Printer Setup
Setting your HP printer up won’t be difficult. Bear with us through these steps and getting your printer to work should be a breeze.
1. Unbox and Remove the Packaging
Open the box and. It likely comes packaged in foil and has plastic strips on the lids. Remove the strips that cover the lids to the paper input, paper output, and cartridge slots. Close the lids.
Your HP printer box comes with a few essential pieces:
- The printer
- Power cord
- USB cable - Optional. Many new printers can only connect wirelessly.
- Cartridges - whether toner or ink, you’ll likely get a starter cartridge. You must use this cartridge at set up, as it differs from replacement ones (even if compatible).
- Attachable elements - The paper tray is often large, so it may come detached from the printer. It should be easy to snap into place.
- User guides - HP packs you up with plenty of informational leaflets. From the set-up guide to the user manual, keep this documentation nearby for reference. Your HP printer model may have a unique feature that requires a specific setup.
- HP Instant Ink card - If your model supports the HP Instant Ink program that sets you up with automatic ink replacements. If your printer is part of the Instant Ink program, you’ll see it written on the box.
2. Power Up
Make sure your printer sits on a flat surface. Attach and plug in the power cable. Then, press the power button.
When it powers up, your printer will start making noise. This is normal - it’s aligning the components inside.
Wait for the noise to stop.
3. Insert Cartridges
Now it’s time to put the ink or toner in. If you got a color printer, you’ll find either two or four cartridges - black and multicolor; or cyan, magenta, yellow, and black.
Find and open the cartridge access door.
That may be a cover on the front, a lid on the back, a release button on the side, or you might need to lift open the top of the printer to expose the cartridge slot.
It may look like staring into the maw of a machine beast - but getting cartridges in is really easy.
Find out if yours is a laser (LaserJet) or an ink printer before you get started. Big, elongated cartridges are usually a sign of laser tech, while ink comes in compact dispensers. Regardless of the type, always opt for genuine HP cartridges to achieve good print results.
If you have a Laser Printer:
- Open the cartridge access cover (it’s usually large) and pull out the toner drawer. It looks like a rack and has a slot that snugly fits the cartridge.
- Remove the packaging and any clips, tabs, or strips from the cartridge - make sure you don’t touch the blue/green drum in the process.
- Shake the cartridge a little, and then insert it into the slot in the drawer. Don’t force it in - it should click in easily. Close the assembly.
➜ Learn more about How to Get Ink and Toner Cartridges to Last Longer
If you have an InkJet Printer:
- Open the cartridge access door. Typically, it’s behind a couple of covers on the front of your printer, or right under the scanner assembly if you have a multifunctional device.
- You should see a horizontal railing and one, two, or four cartridge-shaped slots. It may move automatically, but if not, you can pull the slots gently to the center of the rails. Don’t yank - they slide sideways.
- Remove all packaging. Remove the protective tab over the head of the cartridge (where the electronics and the nozzle are). Take care - don’t touch the metal parts, hold onto the plastic parts of the cartridge.
- Multicolor printer users - check the stickers on the printer or in the user manual to find which cartridge goes into which slot.
- Slide the cartridges in with the electronic parts facing the inside of the printer. It should easily slide and click in. Close the printer.
4. Load with Paper
You have color, it’s time for the other essential element of print - paper.
The paper tray is a plastic part that holds your paper bunches aligned neatly. It’s not essential, but it helps you get straight and uniform printouts.
We recommend attaching your detachable tray or pulling out your telescopic tray and placing paper inside.
Place your paper in bunches no more than ½ inch thick. Cramming the paper tray can result in the printer picking up several sheets at once, the most common cause of paper jams.
5. Offline Printing Test
Your HP printer should now be able to create prints!
Test it offline. Turn on your printer, wait for the noises to stop, and then click the “ GO” button.
If nothing comes out, try clicking and holding the cancel button, or navigating the printer’s onboard settings for reports or test print pages.
If it prints, you’re ready for the next step!
6. Connect
Finally, it's time to connect your printer to your PC so you can get some actually useful documents printed.
On your printer:
Navigate to wireless or network settings, where you’ll be prompted to choose your home WiFi network and write the password.
If your printer doesn’t come with a touchscreen, try pressing and holding the wireless button, or the wireless and cancel buttons together.
Your printer may have a WiFi switch at the back. Click and hold to turn on.
If you don’t want to deal with wireless settings, simply connect your printer and your PC with a USB cable.
On your PC:
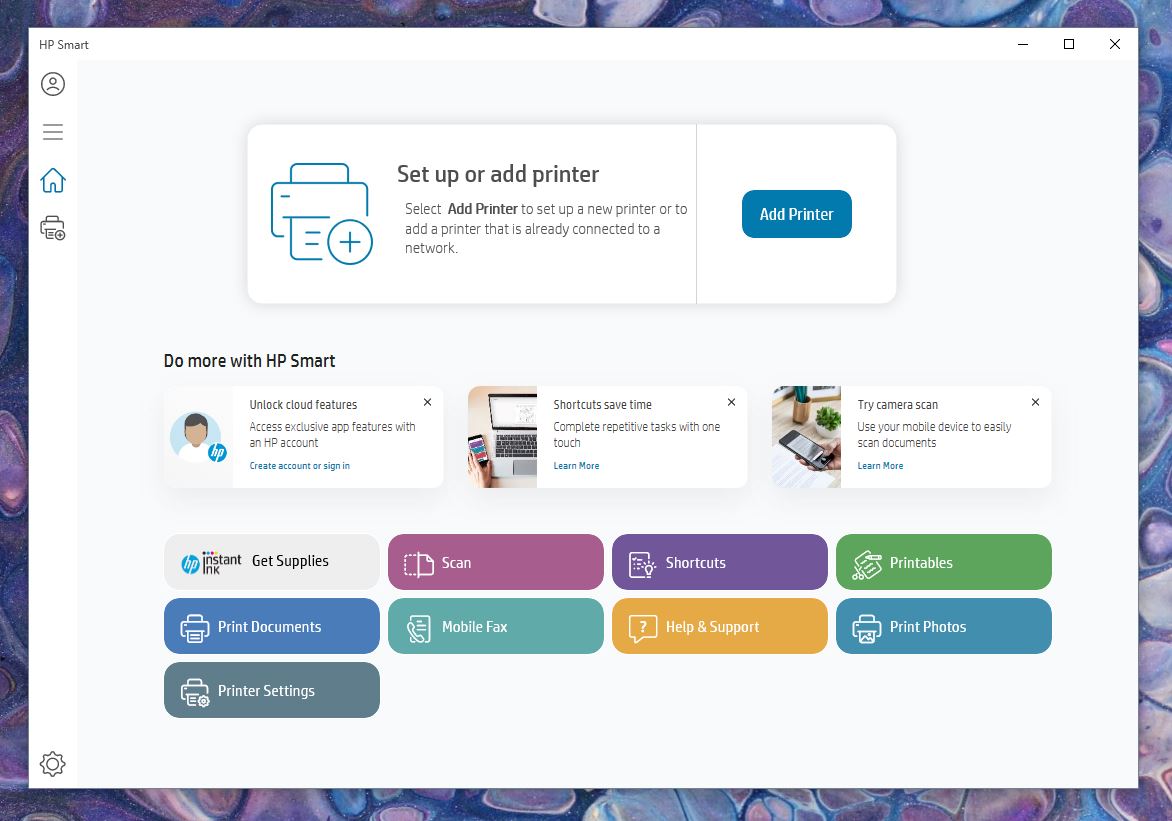
Visit either the Microsoft Store or HP's partner resource website, search for your printer model, and install HP Smart - your control station for your printer - by following the prompts displayed on your screen.
If your printer and your computer are connected to the same wireless network, HP Smart will automatically detect and set it up. If not, run the program, and you’ll see a “set up or add a printer” button.
7. Print, Fax, and Scan on Your HP Printer
Once your printer is connected, you’re all set - it’s time to get that text document out into the real world!
You can do so directly from your computer. Find the document or photoyou want to print. Right-click on it or open it, and click on the “print” option.
It’s even easier if you use HP Smart.
Managing your printer with HP Smart
The HP Smart app is easy to install and use - it’s like a control panel for your printer, but with a user-friendly design. You can get the app on your Windows, macOS, Android, and iOS devices.
When you install the program, create an account, and connect your printer, you’ll notice easily-accessiblebuttons for every function of your printer. HP Smart lets you simply choose and click on what you want to do:
- Document printing,
- Photo printing,
- Scanning,
- Faxing,
- Printer settings,
- Access to a library of printables like cards, productivity worksheets, and file templates,
- One-button way to subscribe for monthly ink delivery (HP Instant Ink program),
- Customizable shortcuts for functions you frequently use,
- Get help from user support.
How to use the various functions of HP Smart?
Simply select the function you want to use, select your document (for print and fax), and a preview window with a few fine-tuning options will pop up.
At this point, you can adjust settings like paper size, resolution, and color settings. If you don’t want to deal with these options, feel free to go with the default settings and click the print, fax, or scan button.
When scanning a document, a preview window will open after the scan process is complete. You can save, share, or print your scanned file from that screen.
HP Smart makes it easy to print, scan, and fax from your computer, tablet, or phone. It also comes with a variety of quality-of-life features that can make your printing experience
Happy Printing
That’s it - HP printer setup and use are really that simple! Of course, different models may require slightly different steps, and you’ll find any specifics in your user manual.
But all in all, with a little bit of time and patience on your hands, installing and using an HP printer is a breeze.
Read more:
- Where to Find the Best Price On Genuine HP Toner
- HP LaserJet Enterprise M607n Printer Review
- Your Ultimate Guide to Genuine HP Toner
- Expectations vs Reality of Printers
- A Toner Buzz Guide to HP+ (All You Need to Know)

Dunja Djuragic
Around 6th grade, Dunja's mother finally let her try to clear out the paper jam on their old Lexmark E120 laser printer. The magnificent world of rollers, drums, powder pigments, laser optics, and ink sprayers unfolded. Some years later, Dunja graduated from the Graphic Engineering and Design department at a local university. Along with being a fastidious home printer user (now using ink!), Dunja earned hands-on experience with offset printing and plotter printers working for a local book and magazine printing shop.