Calculating arrival date


How To Clean Printer Heads and Ink Cartridges
Posted by Rob Errera on 06/06/2023

Arrgh! Streaks! Missing colors! White lines!
Nothing bums out an inkjet user more than the dreaded clogged printhead.
Little bits of dust, debris, and dried ink block the tiny holes on the printhead, and now your prints come out streaky, with white lines where color should be. Your inkjet is only partially jetting.
Some inkjet printers clog more often than others.
The Internet buzzes with conjecture: the micro-holes in Epson printheads deliver sharper prints, but clog more easily.
Canon PIXMA inkjets clog less often because they run a preemptive head cleaning cycle.
But regardless of what brand of inkjet printer you use, clogged printheads are inevitable.
Understanding Printhead Clogs
Printhead clogs can be categorized into three types:
- Simple Clogs: Often resolved by running a head cleaning cycle. After each cleaning cycle, it is crucial to perform a nozzle check to ensure there are no missing lines or gaps on the printout. It is recommended to run the head cleaning cycle twice before checking for missing lines on the printout.
- Stubborn Clogs: When the head cleaning cycle doesn't work, a deeper cleaning method like the Windex Method can be employed. Warm water or an ammonia-based solvent, such as Windex, can help loosen dried ink.
- Hardcore Clogs: For severe clogs, the printhead assembly may need to be removed from the printer for a thorough cleaning. Soaking the printheads in a water and ammonia solution, flushing them under warm tap water, or using needles and syringes to flush cleaning solution are effective options.
Where’s Your Head?
Your inkjet’s printheads are traditionally mounted on the bottom of a plastic carriage inside the printer called the printhead assembly.
The printhead assembly carriage holds the ink cartridges and moves back and forth — with the help of a belt and a stabilizer bar — spraying ink onto the paper.
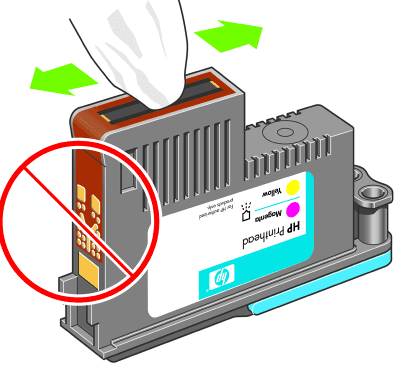
Clean the printhead with a soft, lint-free cloth, but don't touch the electronic components.
⚡ Got a moment? Help us improve your printing experience!
Take our quick survey and share your printing experience with us:
➡️ Take the Survey
Your participation is greatly appreciated and makes a real difference!
Simple Clogs
Printheads contain microscopic holes that shoot out droplets of colored ink.
If you don’t run your printer that often, ink dries out, clogging your printheads.
Even air bubbles in your ink cartridge can block the nozzle. But simple clogs can often be remedied by running a head cleaning cycle and nozzle check on your printer.
In fact, run the head cleaning cycle twice before running a nozzle check.
There should be no missing lines on your printout. If there are, run another head cleaning cycle.
Stubborn Clogs (The Windex Method)
Stubborn Clogs
Sometimes you have to get physical with stubborn clogs. Warm water can often loosen ink that has dried on the nozzles.
Other times you’ll need Windex, or some other ammonia-based solvent, for a deeper cleaning.
- Turn your printer on. It will begin to run through its initialization startup process. As soon as the print heads begin to move along the carriage track, unplug the printer from the wall. This will keep the print heads loose (unparked) along the carriage track, making it easier to move and work on.
- Remove all ink cartridges from the printer. It’s a good idea to wrap them in plastic wrap to keep them from drying out while you work.
- Fold half-a-sheet of paper towel into quarters lengthwise, and dampen with warm water or cleaning solvent. There are several third-party cleaning solvents that can perform a more thorough cleaning.
- Position the damp paper towel on the print track beneath the printhead assembly carriage. Move the printheads back and forth over the damp paper towel. You should see ink residue on the paper towel.
- Get a new piece of paper towel and repeat Step 4 until no residue appears on the damp paper towel when you rub the printhead assembly carriage across it.
- Replace your ink cartridges and power up the printer. Cross your fingers and run a test print!
In the video below, YouTuber Robb’s Homemade Life made a homemade printhead cleaning solution that was 8 parts Windex to 2 parts rubbing alcohol:
Hardcore Clogs
It seems like a cosmic joke. You spend thousands on a top-of-the-line inkjet printer and it clogs more frequently than your $100 inkjet!
High-end inkjet printers use pigment ink which can dry out and clog faster than standard ink. They also use ultra-microscopic printhead holes to deliver the desired detail, but these tiny holes can be quick to clog.
To clear a hardcore clog on a printhead, you’re going to need to perform many of the same procedures used to fix a stubborn clog, only you’ll need to remove the printhead assembly from your printer first.
Removing the printhead assembly is a post for another time, but once it’s out, you have some options for clearing out those stubborn clogged printheads.
One of the most thorough involves soaking the printheads in a solution of water and ammonia for several hours, and then flushing the heads clean by running them under warm tap water.
We’ve seen others have success with this method, and it’s cheaper than replacing the printhead assembly.
Other options for “blasting out” tough clogs include using needles and syringes to flush cleaning solution:
And/or warm water through the printheads, and using a straw or rubber tube to blow air through the printheads:
Cleaning Printer Heads by Printer Model
How to Clean HP Inkjet Printer Heads
Have you run a cleaning cycle on your HP printer and you're still getting spotty prints? You may have a clogged printhead that must be manually cleaned.
Here’s how to clean HP printhead:
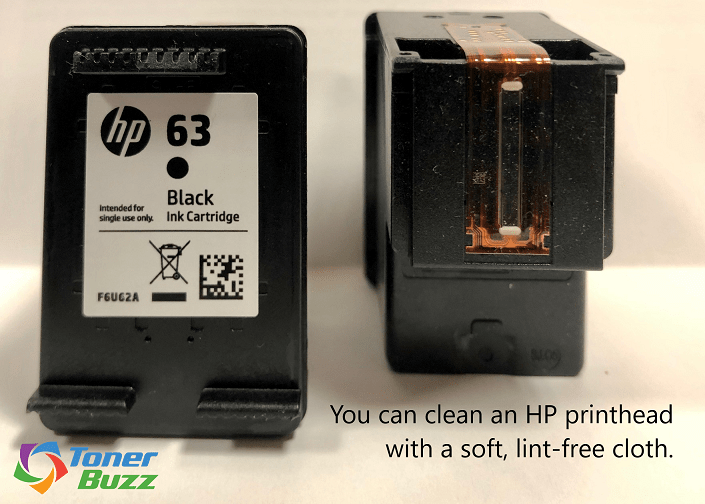
To begin cleaning HP printhead, remove the ink cartridges from your printer. The print heads on HP inkjets are located on the cartridges themselves.
Wet a piece of paper towel with soap and water and place it on a shallow plate. Carefully place the underside of the cartridges on the wet paper towel and allow it to sit for five minutes.
This will loosen any dried or clogged bits of ink. Blot the cartridge dry with a clean sheet of paper towel and replace it in your printer.
This is how to clean HP inkjet printer heads!
The official video from HP on cleaning HP printheads:
How To Clean Brother Printer Heads
Your beloved Brother printer needs a head cleaning!
This is how to clean Brother printer heads:
This process is a little more tricky than cleaning the print heads on an HP since the print heads on a Brother printer are mounted to a fixed carrier inside the printer.
Therefore, you can’t simply pull out the ink cartridges and soak them in a cleaning solution like with HP cartridges.
Still, removing and cleaning the Brother print heads is not difficult.
For starters, run a print cleaning cycle. As soon as the carriage moves to the center of the printer, yank the power cord out of the wall outlet.
This will shut the printer down with the printheads centered in the middle of the machine so you can easily access them.
Position a folded piece of paper towel beneath the printer heads. You’re going to be pumping a cleaning solution through those Brother print heads and you don’t want a mess inside your printer.
Speaking of cleaning solutions, you can either buy a print head cleaning solution online or make your own.
Also, you may want to invest in a Brother printer head cleaning kit. Either way, you’ll need a small syringe and a rubber tube to clean Brother printer heads.
Open the front panel of your Brother printer to access the ink cartridges. Remove the ink cartridges and you’ll see the ink port behind each cartridge.
Fill the syringe about halfway with the cleaning solution and connect the end of the flushing tube to the ink port you wish to clean.
Slowly push the cleaning solution through the ink ports. You should see liquid and bits of dried ink on the paper towel position beneath the ink carriage.
Once you’ve cleaned all of the print heads, plug your Brother back in and run a standard cleaning cycle.
Clean Brother printer heads regularly to ensure the best quality prints.
One clever YouTuber bought empty cartridges for his Brother printer and filled them with a cleaning solution. He popped the custom cleaning cartridge in his printer, ran a cleaning cycle and everything was clean as a whistle! Ingenious!
Here is the video:
And here is another one with instructions on how to clean brother printer heads:
How to Clean Epson Print Head
Like Brother printers, Epson printers also have print heads located on a fixed carriage.
You’ll need to print a page or run a cleaning cycle and unplug your printer in the middle in order to get the heads in position for Epson print head cleaning.
How To Clean Epson Printhead Manually
- Remove your ink cartridges and set them aside.
- Place a piece of folded paper towel beneath the printheads and position them in the middle of the printer.
- Fill a syringe with a cleaning solution and connect the rubber transfer tube to the tip of the syringe. Print head cleaning solution for Epson printers is available online or you can make your own.
- Connect the other end of the transfer tube to the ink ports located behind the cartridges.
- Slowly pump cleaning solution through the ink port until your see liquid on the paper towel.
- Repeat this process for each color cartridge.
- Replace the cartridges and restart the printer.
- Print a test page. If your Epson print head cleaning doesn’t work, repeat the above steps for cleaning Epson printhead.
One suggestion to ease Epson print head cleaning is to submerge your tube of printhead cleaner for Epson printers in a bowl of hot water. This will warm the cleaning solution, making it easier to clean your Epson print heads.
This is how to clean Epson print head nozzles that are blocked or clogged.
Video:
How To Clean Canon Print Head
Ah, Canon how we love thee! But we hate when your print heads clog! Fear not!
Follow the steps below to a clean Canon printhead!
Cleaning Canon printheads:
- Turn off and unplug the machine.
- Open the top lid and inner and lid to access the ink cartridges
- Position the ink cartridge carrier in the center of the machine and remove your ink cartridges.
- Grab the print head assembly by the front, behind the strip with the four colors on ink. Push to the right and pull forward.
- Lift the entire carriage out of the printer. This is the print head assembly.
- Remove the rubber gaskets from around the print nozzle sponges.
- Cover the computer chips on the printer head assembly with tape to protect them.
- Soak the print heads in a cleaning solution.
- Flush the heads clean with a sink nose or hose to remove stubborn clogs.
This is how to clean the printer head on your Canon Pixma as well as other models of Canon printers.
How to clean Canon printheads video:
How To Clean Dell Printer Heads
Cleaning the printhead on a Dell printer is fairly straightforward. Dell printers have a detachable print head similar to Canon models.
Start by opening the top of your Dell so you can access the printer cartridges. Pull those cartridges out and set them aside.
Now, pull right lift the print head assembly up and out of the printer.
Soak the print head assembly in a cleaning solution for about 15 minutes. Then pull it out and pat it dry with a clean paper towel.
Reinstall the print head assembly as well as the ink cartridges and run a test page.
Hopefully, you got it all unclogged! If not, repeat until satisfied.
Cleaning Dell printheads video:
Printhead Clog Prevention
Perhaps the best way to avoid printhead clogs is to stop them from happening.
Keep your ink flowing free by:
- Using your inkjet printer at least twice a week
- Running head cleaning cycles at least once a month
- Occasionally run paper of differing thickness through your printer to clear excess ink off the heads
- Stick with genuine OEM cartridges
- Occasionally use a “cleaning cartridge” or “maintenance cartridge” if available for your model printer
Cleaning Printer Heads - Conclusion
Ink cartridge manufacturers will tell you differently (often boasting about the technological advancements they’ve made in print heads) but they really don’t mind when your print heads clog.
Wasting ink running nozzle checks? Cool by them. That means you buy more ink, which makes ink cartridge manufacturers happy.
Keeping your print heads clean is your responsibility, a hassle that comes with pride of printer ownership.
Use your inkjet printer at least twice a week if not more, run the clean printhead feature on your printer monthly, and you’ll have better prints and less wasted ink in the long run.
FAQ
1. What Is A Printhead?
A printhead is a nozzle where ink is transferred from the ink cartridge to the paper.
These printer head nozzles are usually a series of small, almost microscopic holes. As you might imagine, these tiny holes can clog easily, especially if you don’t use your printer frequently.
To avoid printer head clogs run routine printer maintenance once a month and use your inkjet printer at least once a week.
The first step you should take when you think you have a clogged printer printhead is to run the automatic cleaning cycle on your printer.
You may want to do this two or three times to see if it clears the clog. The automated cleaning cycle forces extra ink through the print heads to loosen any clogs or blockages.
Automated cleaning is a good place to start but it’s not always enough. Sometimes you have to get in there and manually clean your printer heads.
2. What Are Some Effective Cleaning Solutions for Cleaning Printheads?
There are a variety of printhead cleaning solution options available online as well as kits with syringes and piping tubes that will make the job easier.
But for do-it-yourselfers creating a printer head cleaning solution is simple enough.
We’ve seen some videos where people use 100% isopropyl alcohol as a printhead cleaner. While this works, it seems a bit harsh to us. However, if you’ve got a stubborn clog, go for it.
Otherwise use a printer head cleaning solution recipe of 50% water and 50% rubbing alcohol.
We also like a homemade printhead cleaning solution that is 8-parts Windex to 2-parts rubbing alcohol. This printer head cleaning fluid works like a charm and it’s cheap to make!
Further Reading:

Rob Errera
Rob Errera is an award-winning journalist embedded in the world of printers and printing supplies. Rob has nearly two decades of experience writing about cutting edge technology, business trends, and the ever-evolving industry of printing.